Hello world!

Welcome to WordPress.com. This is your first post. Edit or delete it and start blogging!

Posted in Uncategorized | 1 Comment

emacs, vim 功能设置; bibtex 参数设置;latex 字体大小

1, emacs 功能设置 
方法:添加以下代码到.emacs文件中, .emacs文件地址:
(Windows Vista and Win7 是 C:\Users\Username\AppData\Roaming\.emacs)

;打开图片显示功能
(auto-image-file-mode t)

;; 直接跳到某一行
(define-key global-map "\C-x\C-g" 'goto-line)

;;color-theme 设置
下载color-theme压缩包(现在版本为6.6.0)。地址:
http://download.gna.org/color-theme/ 或者 http://ftp.twaren.net/Unix/NonGNU/color-theme/
解压缩color-theme-6.6.0.zip (or tar.gz...). 解压到 Home 目录下
(Windows Vista and Win7 是 C:\Users\Username\AppData\Roaming\.emacs.d\,
然后在 .emacs 中加入
(add-to-list 'load-path "~/.emacs.d/color-theme")
(require 'color-theme)
(load-file "~/.emacs.d/color-theme/color-theme.el")
(color-theme-initialize)
(color-theme-dark-laptop)

;;字体设置
;; set font 字体和字体大小
(set-default-font "Consolas-14")
(set-fontset-font "fontset-default"
'unicode '("微软雅黑" . "unicode-bmp"))

;;不要让光标闪烁
(blink-cursor-mode -1)

2, bibtex in LaTex 在LaTeX中使用BibTeX
为了在LaTeX中使用BibTeX 数据库, 你必须先做下面三件事情:

1) 设置参考文献的类型 (bibliography style). 标准的为 plain:

\bibliographystyle{plain}

将上面的命令放在 LaTeX 文档的 \begin{document}后边. 其它的类型包括

* unsrt – 基本上跟 plain 类型一样, 除了参考文献的条目的编号是按照引用的顺序,
而不是按照作者的字母顺序.
* alpha – 类似于 plain 类型, 当参考文献的条目的编号基于作者名字和出版年份的顺序.
* abbrv – 缩写格式 .

2) 标记引用 (Make citations). 当你在文档中想使用引用时, 插入 LaTeX 命令

\cite{引用文章名称}

"引用文章名称" 就是前边定义@article后面的名称.

3) 告诉LaTeX生成参考文献列表 . 在 LaTeX 的结束前输入

\bibliography{bibfile}

这里bibfile 就是你的 BibTeX 数据库文件 bibfile.bib .

3, Latex的字体
Type Sizes Typestyles

* \tiny \bf bold
* \scriptsize \sf sans serif
* \footnotesize \sc small caps
* \small \tt tpyewriter
* \normalsize \it italic
* \large \rm Roman
* \Large
* \LARGE
* \huge
* \Huge

4, vim 功能设置
方法:添加以下代码到_vimrc文件中, _vimrc在vim安装目录下
:set nu

"色彩模式
colorscheme desert

"语法高亮
syntax enable
" distinguish syntax from file type
syntax on

"显示行号
set number

"set help language
set helplang=cn,en
"set encoding
set encoding=utf-8

"get rid of toolbar
set guioptions-=T

"把gui的右边的滑动条去掉
set guioptions-=r

"把gui的左边的滑动条去掉
set guioptions-=L

"把gui的菜单去掉
set guioptions+=m

"字体为Consolas,大小14号
set guifont=Consolas:h14

"多文件编辑
let g:miniBufExplMapCTabSwitchBufs=1
let g:miniBufExplMapWindowsNavVim=1
let g:miniBufExplMapWindowNavArrows=1

"在工程中快速查找
nnoremap <silent> <F3> :Grep<CR>

let g:winManagerWindowLayout='FileExplorer|TagList'
nmap wm :WMToggle<cr>

"启动最大化
au GUIEnter * simalt ~x "maximum the initial window

"使用space代替tab.
set expandtab
"tab宽度为四个字符 set tab width
set tabstop=4

"使得按退格键时可以一次删掉 4 个空格(不足 4 个时删掉所有剩下的空格)
"set softtabstop=4

" set auto shift width "设定 << 和 >> 命令移动时的宽度
set shiftwidth=4

"保存文件格式
"set fileformats=dos

"2为显示状态栏 (默认值为 1, 无法显示状态栏)
set laststatus=1

"配置taglist的ctags路径
"let Tlist_Ctags_Cmd = 'D:\shi\vim\vim72\ctags.exe'

"设置Taglist
let Tlist_Show_One_File=1
let Tlist_Exit_OnlyWindow=1

" 使用F8打开Taglist
nnoremap <silent> <F8> :TlistToggle<CR>

"设置不兼容VI模式,在增强模式下运行
set nocompatible

"设置GVIM默认目录
lcd d:/ch

"no backup
set nobackup

"关闭光标闪烁
set gcr=a:block-blinkon0

6,用 vim编辑文件时,去掉其中的^M
在 Dos/Windows 里,文本文件的换行符为 \r\n ,而在*nix系统里则为\n,所以 DOS/Windows 里
编辑过的文本文件到了 *nix 里,每一行都多了个 ^M 。删掉该字符可以在 VI 里用下面的方法试试

:% s/\r//g
Posted in Software | 2 Comments

LaTeX: Sections, Divisions, and Page Numbering

Sectioning

In the body of your document, sectioning commands provide the means to structure your text into units. These are all optional, but they can greatly assist in structuring your document.

Sections and Their Depths
Depth in document Section Command Depth for \secnumdepth Command
-1 \part (report and book class only) 1
0 \chapter (report and book class only) 2
1 \section 3
2 \subsection 4
3 \subsubsection 5
4 \paragraph 6
5 \subparagraph 7

In each case, the title of the part, chapter, section, etc goes in the curly braces after the command. LaTeX automatically calculates the correct numbering and prints the title in bold. See below for more on how to modify section numbering. Headings automatically get put into the Table of Contents, if you specify one. Because headings get put into the Table of Contents, LaTeX allows you to create a longer heading, for use in the paper, and a shorter heading for use in the Table of Contents, by specifying it within the heading title command:

Normal heading title command: \section{Some section title here}
With a long heading: \section[Shorter version]{Full, long heading which would be ugly and cumbersome on the Table of Contents}

Section Numbering

All document divisions get numbered by default. To get an unnumbered section, which does not go into the Table of Contents, follow the command name with an asterisk before the opening curly brace like this:

\subsection*{shopping list}

Default Numbering for Sections
Section Type Numbering Example
Parts Uppercase Roman Numerals Part I, Part II
Chapters and Sections Decimal Numbering 1.1, 2, 2.5
Appendixes Uppercase Letters A, B, C

You can change the depth to which section numbering occurs and you can turn it off selectively. To change the depth of the sections numbered, use the depths from the chart above on "Sections and Their Depths" with the command:
\setcounter{secnumdepth}{3}

This command tells LaTeX to set the counter for the section depth to 3, which would stop all numbering after parts, chapters, and sections, so no subsections, paragraphs, or subparagraphs would be numbered. A related counting feature is tocdepth, which specifies the depth to make the Table of Contents. Its command is:
\setcounter{tocdepth}{level}

Page Numbering and Page Style

\pagenumbering

\pagenumbering{num_style}

Specifies the style of page numbers. Possible values of `num_style’ are:

arabic Arabic numerals
roman Lowercase Roman numerals
Roman Uppercase Roman numerals
alph Lowercase letters
Alph Uppercase letters

\pagestyle

\pagestyle{option}

The `\pagestyle’ command changes the style from the current page on throughout the remainder of your document.

The valid options for the \pagestyle command are:

plain Just a plain page number.
empty Produces empty heads and feet – no page numbers.
headings Puts running headings on each page. The document style specifies what goes in the headings.
myheadings You specify what is to go in the heading with the \markboth or the \markright commands.
Posted in Uncategorized | Leave a comment

LaTeX 文档

使用latex编写文档
1) latex file
2) pdf file

\documentclass[12pt]{article}
\usepackage[colorlinks,linkcolor=blue,anchorcolor=red,citecolor=green,CJKbookmarks=true]{hyperref}
\usepackage{CJK}

\begin{document}
\begin{CJK}{GBK}{song}

\title{LaTeX 文档}
\author{shi~Cheng\\
shi.cheng@live.com}
\date{\today}
\maketitle
\tableofcontents

\begin{abstract}
  LateX文档中 公式, 中文, 摄氏度, 角度, 定理, 定义, 目录, 链接, 书签, 分数, 开方, 摘要, references
\end{abstract}

\section{公式}
\begin{enumerate}
    \item 无序号公式 使用$\backslash$begin\{displaymath\}与$\backslash$end\{displaymath\}
    \item 有序号公式 使用$\backslash$begin\{equation\} 与 $\backslash$end\{equation\}.
    \item 在段落中直接使用公式, 公式需写在\$ \$或者$\backslash$[ 与$\backslash$]之间
    \item 公式在$\backslash$begin\{displaymath\}与$\backslash$end\{displaymath\} 或者$\backslash$begin\{equation\} 与 $\backslash$end\{equation\}时, $\sum$ 的上下标将自动位于$\sum$的上下方居中. 对于段落中的公式, $\backslash$sum默认上下标是写在右上角和右下角, 如在上下方居中,则须加入$\backslash$limits命令. 例如: $\sum\limits_{i=1}^n a_i$ 的命令为: \$$\backslash$sum$\backslash$limits\_\{i=1\}$\,\hat{}\,$n a\_\{i\}\$
    \item 在公式中插入文本, 使用$\backslash$text\{文本\}, 或者$\backslash$mbox\{文本\}
    \item 公式换行:
    \begin{eqnarray*}
      \cos 2\theta & = & \cos^2 \theta – \sin^2 \theta \\
      & = & 2 \cos^2 \theta – 1.
    \end{eqnarray*}
    code:\\
    $\backslash$begin\{eqnarray*\}\\
      $\backslash$cos 2$\backslash$theta \& = \& $\backslash$cos$\,\hat{}\,$2 $\backslash$theta – $\backslash$sin$\,\hat{}\,$2 $\backslash$theta \\
      $\&$ = $\&$ 2 $\backslash$cos$\,\hat{}\,$2 $\backslash$theta – 1.\\
    $\backslash$end\{eqnarray*\}\\
    其中\&是对其点,表示在此对齐。*使LaTeX不自动显示序号,如果让latex自动标序号,则去掉*
\end{enumerate}

\section{中文}
\begin{enumerate}
  \item 在$\backslash$begin\{document\}后加入$\backslash$begin\{CJK\}\{GBK\}\{song\}
  \item 在$\backslash$end\{document\}前加入$\backslash$end\{CJK\}
\end{enumerate}

\section{摄氏度, 角度}
\begin{enumerate}
    \item 摄氏度 $30\,^{\circ}\mathrm{C}$ code: \$30$\backslash$,$\,\hat{}\,$\{$\backslash$circ\}$\backslash$mathrm\{C\}\$
    \item 角度 $30^{\circ}$ code: \$30$\,\hat{}\,$\{$\backslash$circ\}\$
\end{enumerate}

\section{定理, 定义}
定义环境, 使用 $\backslash$newtheorem\{defineName\}\{Definition\}[section]\\
defineName (可更改) 是定义的短关键字,用于标识“定理/定义”。Definition (可更改)是“定理/定义”的真实名称, 显示在最终文件. 方括号选项可选, 用于指定“定理”的标号。
\newtheorem{defineName}{Definition}[section]
\begin{defineName}[text]
  This is a definition
\end{defineName}
code:\\
$\backslash$newtheorem\{defineName\}\{Definition\}[section]\\
$\backslash$begin\{defineName\}[text]\\
  This is a definition\\
$\backslash$end\{defineName\}\\

\section{目录, 链接, 书签}
\begin{enumerate}
  \item 目录 在添加目录处使用 $\backslash$tableofcontents 命令
  \item 链接 使用 $\backslash$usepackage\{hyperref\} 命令, 此命令自动产生pdf文件书签
  \item 链接支持中文 使用$\backslash$usepackage[CJKbookmarks=true]\{hyperref\}命令
  \item LaTeX 默认链接为方框, 修改方框链接为彩色, 使用命令 $\backslash$usepackage[ colorlinks,linkcolor=blue,anchorcolor=red,citecolor=green]\{hyperref\}
  \item 中文彩色链接 $\backslash$usepackage[colorlinks,linkcolor=blue,anchorcolor=red, citecolor=green,CJKbookmarks=true]\{hyperref\}
\end{enumerate}

\section{分数, 开方}
\begin{enumerate}
  \item 分数: $\frac{numerator}{denominator}$ code: \$$\backslash$frac\{numerator\}\{denominator\}\$
  \item 开方: $\sqrt{expression}$ code: \$$\backslash$sqrt\{expression\}\$
  \item 开 n 次方 $\sqrt[n]{expression}$ code: \$$\backslash$sqrt[n]\{expression\}\$, [n]为开方参数
\end{enumerate}

\section{摘要}
\begin{enumerate}
  \item 在 article 环境中, 使用在$\backslash$begin\{abstract\} 和 $\backslash$end\{abstract\}
  \item 在 book 环境中, 使用$\backslash$chapter*\{Abstract\}
  \item $\backslash$chapter* 表示此chapter不编号.
\end{enumerate}

\section{references}
\begin{enumerate}
  \item 使用 $\backslash$begin\{thebibliography\} 与 $\backslash$end\{thebibliography\}\\
    $\backslash$begin\{thebibliography\}\{100\}\\
    \{$\backslash$small\\
    $\backslash$bibitem\{Kennedy\} James\,\~{}\,Kennedy, Russell\,\~{}\,C.\,\~{}\,Eberhart, Yuhui\,\~{}\,Shi. \{$\backslash$it Swarm Intelligence\}. Morgan Kaufmann Publishers 2001\\
    \}\\
    $\backslash$end\{thebibliography\}
  \item 使用bibtex
\end{enumerate}
\end{CJK}
\end{document}

Posted in Latex | Leave a comment

LaTex: Matrix and determinant of matrix

在LaTeX中插入矩阵和行列式
1. tex file
2. pdf file
% usepackage
\usepackage{amssymb}
\usepackage{amsmath}
\usepackage{amsthm}

% code
The \emph{characteristic polynomial} $\chi(\lambda)$ of the $3 \times 3$ ~matrix
\[ \left(
\begin{array}{ccc}
    a & b & c \\
    d & e & f \\
    g & h & i
\end{array} \right)\]
matrix1
is given by the formula
\[ \chi(\lambda) = \left|
\begin{array}{ccc}
    \lambda – a & -b          & -c \\
    -d          & \lambda – e & -f \\
    -g          & -h          & \lambda – i
\end{array} \right| \]
matrix2
$ \Psi(\mathbf{x}_1, \mathbf{x}_2, \ldots, \mathbf{x}_N) =
\frac{1}{\sqrt{N!}} \left|
\begin{matrix}
    \chi_1(\mathbf{x}_1) & \chi_2(\mathbf{x}_1) & \cdots & \chi_N(\mathbf{x}_1) \\
    \chi_1(\mathbf{x}_2) & \chi_2(\mathbf{x}_2) & \cdots & \chi_N(\mathbf{x}_2) \\
    \vdots               & \vdots               &        & \vdots               \\
    \chi_1(\mathbf{x}_N) & \chi_2(\mathbf{x}_N) & \cdots & \chi_N(\mathbf{x}_N)
\end{matrix} \right| $
matrix3
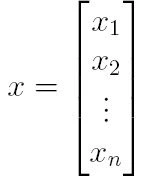
\begin{displaymath}
    x = \left[
        \begin{matrix} x_{1}   \\
                       x_{2}   \\
                       \vdots  \\
                       x_{n}
        \end{matrix}   \right]
\end{displaymath}
matrix4 

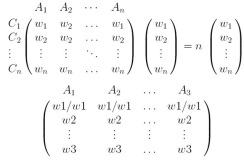
$$
\bordermatrix{
              & A_1     & A_2     & \cdots & A_n     \cr
    C_1     & w_1     & w_2     & \ldots & w_1     \cr
    C_2     & w_2     & w_2     & \ldots & w_2     \cr
    \vdots & \vdots & \vdots & \ddots & \vdots \cr
    C_n     & w_n     & w_n     & \ldots  & w_n     \cr
            }
\bordermatrix{
    &        \cr
    & w_1    \cr
    & w_2    \cr
    & \vdots \cr
    & w_n    \cr
} =n \bordermatrix {
    &        \cr
    & w_1    \cr
    & w_2    \cr
    & \vdots \cr
    & w_n    \cr
}
$$
$$
\bordermatrix{
     & A_1    & A_2    & \ldots & A_3    \cr
     & w1/w1  & w1/w1  & \ldots & w1/w1  \cr
     & w2     & w2     & \ldots & w2     \cr
     & \vdots & \vdots & \vdots & \vdots \cr
     & w3     & w3     & \ldots & w3     \cr
}
$$

matrix5

Posted in Uncategorized | Leave a comment

Boost Install

windows系统中, 编译boost_1_40_0, jam为 boost-jam-3.1.17. C++编译器为 visual studio 2005

1. download the source of Boost and Boost Jam from http://www.boost.org/.

2. release the Boost source files to folder, e.g. d:\shi\boost. release Boost Jam to the subfolder of the Boost sourced:\shi\boost\jam.

3. open Visual Studio e.g. .NET 2005, 工具 -> 选项 -> 项目 ->VC++目录(Tools -> Options -> Projects and Solutions -> VC++ Directories), 在"包含文件目录 (Include files) "里,增加一行,如:D:\shi\boost 这样就可以使用大多数的Boost类库. 使用 test code 1 来验证include files

—————–test code 1 ——————————-
#include <vector>
#include <iostream>
#include <boost/lexical_cast.hpp>

using namespace boost ;
using namespace std ;

int main(int argc, char * argv[])
{
  vector<int> v1;
  vector<int>::const_iterator ci_v1 ;
  int iLength = 0 ;

  while( iLength < 10 )
  {
    try
    {
      if ( iLength == 5 )
        v1.push_back(lexical_cast<int>("chengshi")) ;
      else
        v1.push_back(lexical_cast<int>(iLength));
      }
      catch(bad_lexical_cast &ex)
      {
        cout << ex.what()<< endl ;
        v1.push_back(-1);
      }
      iLength++ ;
    }

    cout << "vector –> " ;
    for ( ci_v1 = v1.begin() ; ci_v1 != v1.end() ; ci_v1++ )
    {
      cout << *ci_v1 << " " ;
    }
    cout << endl ;

    system("pause");
    return 0 ;
}
————————–test code 1 ———————

4. 少数的类库需要额外再生成对应操作系统的动态库, 才可以使用以Windows+VS2005为环境, 以regex类库举例说明. regex为我们提供了正则表达式功能, 其中boost的regex支持perl语法, 更极大的提升了使用正则表达式所产生的效果. 但要想使用regex, 需要生成相关的lib文件才可以. 生成的步骤如下: 开始(Start) -> Microsoft Visual Studio.NET 2005 -> Visual Studio.NET 工具(Tools) -> Visual Studio.NET 2005 命令提示(Command Prompt). 使用这个命令提示符之后, VS就会为我们自动配置好VC环境. 打开命令提示符之后, 我们进入目录 D:\shi\boost\libs\regex\build, 现在我们敲入 nmake /fvc8.mak 生成lib文件. 生成lib文件之后, 单独建一个文件夹, 例如建立的是d:\boost_libs, 然后把所有的*.lib文件拷贝到这个目录. 然后我们打开VS2005,选择菜单工具–>选项–>项目–>VC++目录(Tools -> Options -> Projects and Solutions -> VC++ Directories), 在"库文件(Library files)"里加入目录d:\boost_libs, 这样VS2005在链接时, 就会搜索这个目录

——————— test code 2 ————————-
#include <iostream>
#include <string>
#include <iterator>
#include <boost/regex.hpp>

using namespace boost;
using namespace std;

int main(int argc, const char** argv)
{
    wchar_t * strSample = L"[测试]cheng 2007-05-15 测试 " ;
    wregex rgExpression(L"(\\[(\\S*)\\])((\\S|\\s)*)(\\d{4,}-\\d{2,}-\\d{2,})((\\S|\\s)*)", boost::regex::perl) ;
    wcmatch what ;

    wcout.imbue(locale("chs"));
    try
    {
        if(regex_match(strSample, what, rgExpression))
        {
        wcout << L"match!" << endl ;
            for (unsigned int i = 0 ; i < what.size() – 1 ; i++ )
            {
                wcout << L"what[" << i << L"] –> " << what[i] << endl ;
            }
        }
        else
        wcout << L"not match!" << endl ;
    }
    catch(…)
    {
        return -1;
    }
    system("pause");
    return 0;
}
———————test code 2 —————————
如果编译上面的程序, 在链接时没有报错, 就是正确链接了lib库文件.
* gcc 不支持宽字符串
 
5. 使用Boost.Jam来Build所有的库. 首先, 打开VC.NET 2005的命令提示符(Command Prompt), 然后进入D:\shi\boost\jam目录, 运行build.bat. 这时会生成 bjam的可执行程序并且在jam下生成bin.ntx86这个子目录。
6. 配置环境变量PATH, 以便用 bjam来build boost. 配置步骤如下:右键我的电脑 -> 属性 -> 高级 -> 环境变量, 在PATH这个变量后面加入bin.ntx86所在的绝对路径。e.g. ";D:\shi\boost\jam\bin.ntx86". 注意: 每个绝对路径要用分号隔开. 同时要重新打开命令提示符, 因为环境变量只在打开命令提示符的时候读取一次.
7. 进入D:\shi\boost目录, 直接敲bjam, Build就会自动开始, 并生成Boost库.

8.前面工作都是把整个boost的安装过程分解,其实下面的内容如果不做,也可以正常的使用Boost。现在介绍是标准的 Boost 建立和安装过程. 这部分将使用上面所介绍过的一些知识来做一下标准Boost的Build和Install过程. Boost的安装过程其实很简单: 建立一个d:\boost目录,然后解压zip 文件到d:\boost。首先用上文中介绍的方法Build bjam的可执行文件(参与上面的步骤),然后进入d:\boost。 在命令行执行bjam –prefix=d:\boost install 执行后,会在d:\boost生成所需要的所有库和头文件。然后你用上面介绍的配置Visual Studio.NET 2005的方法配置include目录为 D:\boost, lib目录为D:\boost\lib.

bjam的参数含义:
–build-dir=<builddir>      编译的临时文件会放在builddir里(这样比较好管理,编译完就可以把它删除了)
–stagedir=<stagedir>     存放编译后库文件的路径,默认是stage
–build-type=complete     编译所有版本,不然只会编译一小部分版本(确切地说是相当于:variant=release, threading=multi;link=shared|static;runtime-link=shared)
variant=debug|release     决定编译什么版本(Debug or Release?)
link=static|shared     决定使用静态库还是动态库。
threading=single|multi     决定使用单线程还是多线程库。
runtime-link=static|shared     决定是静态还是动态链接C/C++标准库。
–show-libraries     显示需要编译的库名称
命令行的install的意思是指要安装库文件和头文件
–prefix的意思是说安装独立文件的路径. 上面使用的是d:\shi\boost.
–exec-prefix的意思是安装依赖文件的路径. 上面我们没有输入. 默认prefix提供的目录, 在本例中, 是d:\boost
–libdir的意思是指安装库文件的路径. 上面也没有输入. 默认是exec-prefix提供的目录加lib, 本例中exec-prefix使用的是prefix的目录, libdir为d:\boost\lib
另外还有一些比较常用的参数如:
–includedir 这个参数是头文件所在的目录.
–with 指Build或Install单独的库, 如果使用这个参数,可自动完成指定库的Build和Install。例如:bjam –prefix=d:\boost install –with-regex

編譯好的lib,所代表意義:
gd — Debug
mt — Multi Thread
sgd– Runtime-link-static的debug
s — 在Runtime-link-的時候,是用static的方式
serialization == ansi
wserialization == Unicode

9. Dev-C++, 使用 Tools -> Compiler Options -> Directories -> C++ includes 来include Boost的head files.

Posted in Programming | Leave a comment

LaTeX: code insert

在LaTeX文档中, 插入代码, 使用 listings 宏包

用法:

\usepackage{listings}

\lstset{breaklines}  %LaTeX自动将长的代码行换行排版

1. 直接把代码写入TEX文本中

\begin{lstlisting}[language=***]

source

\end{lstlsting}

2. 调用并嵌入源文件

\lstinputlisting{filename.*}

a)  file default extension: tex. 如果仅用 ilename 不加后缀名 .*, CTex会自动寻找 filename.tex文件

b) filename.*,  .* 可以为任意纯文本文件

c)  使用 \usepackage{CJK}后, \begin{lstlisting}和 end{lstlsting}间可以使用中文, 但 \lstinputlisting{filename.*}, finaname.* 不能包含中文 (会出现乱码, 或编译错误)

latex file

pdf file

code file

codeInsert

———————- latex file ———————

\documentclass[12pt]{article}
\usepackage{listings}
\usepackage{CJK}

\lstset{breaklines}
\lstset{extendedchars=false}

\begin{document}
\begin{CJK}{GBK}{song}

\title{algorithm}
\author{shi~Cheng}
\maketitle

\section{algorithm}
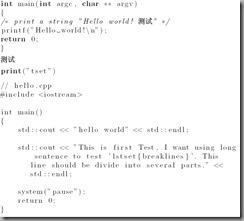
\begin{lstlisting}[language=C]
int main(int argc, char ** argv)
{
/* print a string "Hello world! 测试" */
printf("Hello world!\n");
return 0;
}
\end{lstlisting}
测试
\begin{lstlisting}[language=Python]
print("tset")

\end{lstlisting}
\lstinputlisting{hello.cpp}
\end{CJK}

\end{document}
Posted in Latex | 1 Comment

Latex: Formula in Table

latex文件中, 在表格中插入公式

文件地址:

a) formulaInTable.tex

b) formulaInTable.pdf

formulaInTable 

\documentclass[12pt]{article}
\usepackage{amsmath}
\begin{document}
\title{formula in table}
\author{Shi~Cheng\\
shi.cheng@live.com}
\date{September~10,~2009}
\maketitle

\begin{abstract}
set formula in table
\end{abstract}

\section{section}
\begin{tabular}{|c|c|} \hline
Formula & Explanation \\ \hline
      $h_\sigma(a,B)=
            \left\{
            \begin{array}{rl}
                1 & \mbox{if }d(a,B) \leq \sigma  \\
                0 & \mbox{if }d(a,B)> \sigma
            \end{array}\right.
            \label{pan}$
          Explain something here.& your explanation\\ \hline
\end{tabular}
\end{document}

Posted in Latex | 1 Comment

excel畫折線圖

說明:
1) 這是一篇 latex 練手之作, 寫成之后發現latex生成的pdf文件無法被復制到 word中, 源代碼也無法復制到word中, 復制
后變成亂碼. ultraEdit可以自動改變編碼, 只能源代碼復制到 ultraEdit, 但將ultraEdit轉碼后的文件保存為tex, 
latex卻也不能編輯. 復雜的編碼問題…
2) .jpg 不能生成 .dvi文件, 使用' latex filename '命令, 會提示' !Latex Error: File 'figureName.bb' not found.'
應使用'pdflatex filename' 將tex文件轉換為pdf文件查看
3) 排版問題
a) 圖片粘貼在latex文件中,緊隨 \includegraphics{fig.jpg}
b) 長句子顯示在網頁中, 會自動截斷文字, 需手動換行
4) 文件地址:
a) tex 文件
b) 編譯完成的 pdf 文件
\documentclass[12pt]{article} 
\usepackage{CJK}
\usepackage{graphicx}
\usepackage{color}

\begin{document}
\begin{CJK}{GBK}{song}
\title{\Large {\CJKfamily{hei} excel~畫折線圖}}
\author{Shi~Cheng}
\date{2009/05/22}
\maketitle

\begin{abstract}
使用~excel~來對一些點進行擬合, 得到這些點構成的折線圖
\end{abstract}

\section{要求和原始數據}
曲線圖的要求:\\
1) 取表格~Table\ref{tab:data}~第二列數據~Number of Items~作為~$X$~軸\\
2) 表格第三到六列數據~method A - D~ 表示四種不同~method~完成排序所花費的~step~數目, 這構成折線圖的~$Y$~軸\\
3) 將四種~Method~隨~Number of Items~增加后, ~step~數目趨勢表示在折線圖上\\
原始數據如下表格~Table\ref{tab:data}~所示:
\begin{center}
\begin{table}[htp]
\centering
\caption{original~data}
\begin{tabular}{|c|c|c|c|c|c|}\hline\\
serial & NumOfItem & methodA & methodB & methodC & methodD\\ \hline\\
1 & 100 & 653 & 541 & 9166 & 4900\\ \hline\\
2 & 150 & 1091 & 897 & 18809 & 11089\\ \hline\\
3 & 200 & 1495 & 1276 & 33546 & 19766\\ \hline\\
4 & 250 & 2011 & 1679 & 52369 & 30922\\ \hline\\
5 & 300 & 2647 & 2100 & 75431 & 44479\\ \hline\\
6 & 350 & 3061 & 2524 & 102760 & 60662\\ \hline\\
7 & 400 & 3712 & 2963 & 134624 & 79606\\ \hline\\
8 & 450 & 4246 & 3396 & 158549 & 100627\\ \hline\\
9 & 500 & 4693 & 3857 & 195896 & 124258\\ \hline\\
10 & 550 & 5203 & 4321 & 237301 & 150630\\ \hline\\
11 & 600 & 6121 & 4788 & 282181 & 179124\\ \hline\\
12 & 650 & 6759 & 5265 & 331622 & 210561\\ \hline\\
13 & 700 & 7231 & 5745 & 384261 & 244038\\ \hline\\
14 & 750 & 7698 & 6226 & 441366 & 280243\\ \hline\\
15 & 800 & 8384 & 6722 & 502153 & 318852\\ \hline\\
16 & 850 & 9141 & 7213 & 566964 & 360035\\ \hline\\
17 & 900 & 9734 & 7711 & 635202 & 403345\\ \hline\\
18 & 950 & 10519 & 8212 & 708426 & 450002\\ \hline
\end{tabular}
\label{tab:data}
\end{table}
\end{center}
\pagebreak
\section{繪制折線圖步驟}
折線圖繪制步驟:\\
1) 將數據填入~excel~單元格中, 如~Figure\ref{fig:data}~所示:
\begin{figure}[htp]
\centering
\includegraphics{graphics/data.jpg}
data
\caption{copy data into excel}
\label{fig:data}
\end{figure}
\newpage
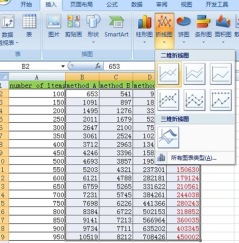
2) 首先繪制四種方法的對比圖, 選擇需要生成的四組數據, 鼠標左鍵依次點擊 菜單欄 {\textcolor{blue}{\bf 插入}}
 ~$\rightarrow$~{\textcolor{blue}{\bf 折線圖}}~$\rightarrow$~{\textcolor{blue}{\bf 二維折線圖}}, 如
~Figure\ref{fig:insert}~所示:
\begin{figure}[htp]
\centering
\includegraphics{graphics/insert.jpg}
insert
\caption{choose a type of line chart}
\label{fig:insert}
\end{figure}
\newpage
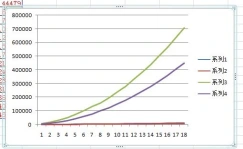
3) 鼠標左鍵點擊折線圖, ~excel~自動生成折線圖如~Figure\ref{fig:fourM}~所示:
\begin{figure}[htp]
\centering
\includegraphics{graphics/fourM.jpg}
fourM
\caption{create a line chart for four method}
\label{fig:fourM}
\end{figure}
\newpage
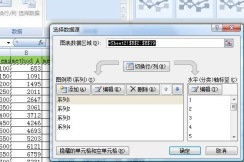
4) 鼠標左鍵點擊工具欄{\textcolor{blue}{\bf 選擇數據}}, 出現圖例項和水平軸的編輯框, 如~Figure\ref{fig:edit}~所示:
\begin{figure}[htp]
\centering
\includegraphics{graphics/edit.jpg}
edit
\caption{edit the line chart}
\label{fig:edit}
\end{figure}
\newpage
或在折線圖上, 點擊鼠標右鍵, 再點擊{\textcolor{blue}{\bf 選擇數據}}, 進入編輯框, 如~Figure\ref{fig:edit2}~所示:

\begin{figure}[htp]
\centering
\includegraphics{graphics/edit2.jpg}
edit2
\caption{edit the line chart in other way}
\label{fig:edit2}
\end{figure}
\newpage
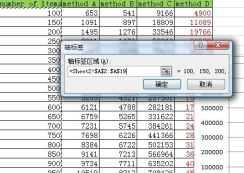
5) 點擊 ~{\textcolor{blue}{\bf 水平(分類)軸標簽}}~ 的 ~{\textcolor{blue}{\bf 編輯}}~, 選擇
~{\textcolor{blue}{\bf 軸標簽區域}}, 點擊~{\textcolor{blue}{\bf 確定}}, 如~Figure\ref{fig:editx}~所示:
\begin{figure}[htp]
\centering
\includegraphics{graphics/editx.jpg}
editx
\caption{choose the x coordinate axes}
\label{fig:editx}
\end{figure}
\newpage
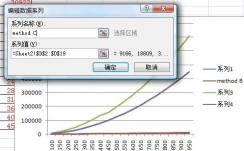
對系列進行~{\textcolor{blue}{\bf 添加}}~, ~{\textcolor{blue}{\bf 編輯}}~, ~{\textcolor{blue}{\bf 刪除}}~
操作. 選擇任意系列, 點擊~{\textcolor{blue}{\bf 編輯}}~, 為各個系列添加系列名, 如~Figure\ref{fig:editi}~所示:
\begin{figure}[htp]
\centering
\includegraphics{graphics/editi.jpg}
editi
\caption{change item's name}
\label{fig:editi}
\end{figure}
\section{折線圖}
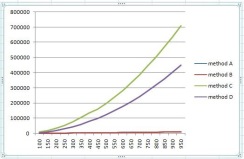
最終形成的圖形如~Figure\ref{fig:fourF}~所示:
\begin{figure}[htp]
\centering
\includegraphics{graphics/fourF.jpg}
fourF
\caption{the final figure}
\label{fig:fourF}
\end{figure}
\newpage
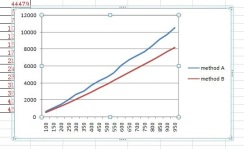
{\textcolor{red}{\bf method A}}~與~{\textcolor{red}{\bf method B}}幾乎重合, 單獨作圖將這兩個method
區分開, 如~Figure\ref{fig:twoM}~所示:
\begin{figure}[htp]
\centering
\includegraphics{graphics/twoM.jpg}
twoM
\caption{create a line chart for four method}
\label{fig:twoM}
\end{figure}
\section{conclusion}
excel可以做出 {\textcolor{blue}{柱形圖 折線圖 餅圖 條形圖 面積圖 散點圖}} 等圖形, 單獨對于折線圖也可以有
不同的~{\textcolor{blue}{圖表布局}}~方式, 折線圖可以分為~{\textcolor{blue}{二維折線圖 三維折線圖}}, 又可
分為~{\textcolor{blue}{堆積折線圖 百分比折線圖}}等.\\
{\textcolor{red}{\bf \it Practice make perfect}}
\end{CJK}
\end{document}
Technorati Tags: ,,

Posted in Latex | 4 Comments

Academic writing.3: Paraphrase

Original Passage

Finally, how can astronauts ‘let off stream’ when interpersonal conflicts develop? Even best friends can irritate each other when forced to spend weeks together in isolation. Space stations are small, cramped, busy workspaces and there is little privacy. Also, space exploration is dangerous, which adds to the stress aboard a spaceship.

Paraphrase

NASA physician Patrick Clinton states that the way <of> astronauts release <releases> their resentment when disagreement happen <happened> is a problem. Close friends may annoy each other when they have to stay together in a tiny space for a long time. Astronauts cannot be alone as the space is tiny and insufficient. The dangers <dangerous> of space exploration also make astronauts nervous. [18].

The original passage is from <A HISTORY OF WESTERN PHILOSOPHY And Its Connection with Political and Social Circumstances from the Earliest Times to the Present Day> by Bertrand Russell.

Original Passage

Philosophy, as I shall understand the word, is something intermediate between theology and science. Like theology, it consists of speculations on matters as to which definite knowledge has, so far, been unascertainable; but like science, it appeals to human reason rather than to authority, whether that of tradition or that of revelation. All definite knowledge–so I should contend–belongs to science; all dogma as to what surpasses definite knowledge belongs to theology. But between theology and science there is a No Man’s Land, exposed to attack from both sides; this No Man’s Land is philosophy. Almost all the questions of most interest to speculative minds are such as science cannot answer, and the confident answers of theologians no longer seem so convincing as they did in former centuries. Is the world divided into mind and matter, and, if so, what is mind and what is matter? …

Paraphrase

The philosopher Bertrand Russell states that philosophy is something between theology and science in his <[his]> understanding of the word <vocabulary>. Similar to <Like> theology, philosophy composes <hypothesis> hypotheses on the area of universe about which knowledge is <, for example, the definition of knowledge are> still uncertain. However, similar to <like> science, Philosophy is more logical <reasonable> than obedient to some higher power/being, either that of a king or a god <from in all ages>. All the certain <definition of> knowledge is part of science and the beliefs beyond the certain <definition of> knowledge is part of theology in his <[his]> opinions. However, the empty area between theology and science is criticized from both sides and this area, he maintains is philosophy. For most philosophical questions, <the> science cannot give certain answers to thinking and analytical persons <persons who like think and analysis>, and <the> theology cannot make people deeply believe <believes them> like in centuries gone by / previously centuries <former centuries>. Can the world be separated <separate> as mind and matter? If the answer is yes, how to define <definition> mind and matter? …[10]

Technorati Tags:
Posted in Academic Writing | Leave a comment